
Mars - 12th September 2020
With Mars reaching opposition on the 13th October this year (2020) now is the time to get imaging ‘The Red Planet’ while it is at it’s biggest and brightest for many years to come.
Mars has been a great target since early August and this will continue until December at least, in fact November and December offer the best times to view the planet if you don’t like late nights or early mornings, especially if you are not an obsessive like me who doesn’t mind getting out of bed at 3 am to view and image the planet in the months before opposition!
This post will hopefully give you a few tips on imaging this beautiful planet from capture right through to final processing, hopefully you’ll find it useful.
The Imaging Train
The information in this post relates to my setup which is a Celestron Edge HD11 scope, Televue 2.5x Powermate & ASI174MM camera. Filters mentioned are Baader 685nm IR and ZWO R,G,B. Images are captured using filters and a mono camera, colour images being created in PhotoShop CC. Software used is AutoStakkert 3, Registax 6, WinJupos (all free for non commercial use) and PhotoShop Creative Cloud.

The picture above shows my imaging train for planetary work. From top to bottom it shows Televue 2.5x Powermate, ZWO ADC (I tend not to use it for Mars when it is riding high in the sky as it is at the moment so would typically remove it, when using I remove the flip mirror), flip mirror & eyepiece, filter wheel, ZWO ASI174MM camera. Top of the picture shows the electronic focuser. I’ll go into a little more detail on the purpose of each of these below:
Focus - It goes without saying that if the data you are capturing is not properly focused the end result, no matter how much post processing you do, will be disappointing. When imaging at long focal lengths it can be a challenge to achieve that optimal focus especially if you have to touch the telescope to turn the focusing knob. An electronic focuser really helps as it enables you to focus without touching the telescope and makes finding fine focus relatively easy. I can’t recommend getting one enough if you are serious about high resolution imaging. For Mars focus on the bright limb of the planet and achieve fine focus on the albedo features. Remember you will need to re-focus after each filter change, even if you believe your filters to be parfocal.
Image Size - When imaging any planet you want it to occupy as much of your chip as possible so image amplification is essential. I use a 2.5x Televue Powermate which increases the focal length of my setup to 7000mm providing a decent image scale when paired with my Celestron Edge HD11 scope.
Filters - As I’m imaging using a mono planetary camera I have to place filters in front of it to ultimately achieve a colour image. The filters I use for Mars are 685nm IR, Red and Blue (more on this later!)
Camera - For best results a high frame rate planetary camera is a must, I would recommend a mono camera for best resolution but some colour cameras do produce good results and are easier to use but perhaps at the sacrifice of versatility & resolution.
Capturing Your Data
For image acquisition I use SharpCap Pro but you can also use FireCapture which is many people’s preferred capture software, either of these does a good job. I started off my planetary imaging journey using SharpCap and feel most comfortable with it so haven’t felt the need to change.
How much data should I capture? At the moment Mars is an absolute joy to image for us northern hemisphere astrophotographers, it is at a good altitude and bright, something we have been starved of over the past few years with both Jupiter and Saturn skimming our horizons! A benefit of this is that you can capture lots of data in a very short period of time. I aim to image five sets of 4000 frames through IR (optional), Red and Blue filters, you can also image through a green filter but I like to create a synthetic green channel (more in the final processing section). Once done you will have generated 20,000 frames through each filter, 60,000 in total or 80,000 if you are also shooting a green channel! Sounds a lot but you can capture all this within 10 minutes.
What settings should I use? Everyone’s setup is different so settings will differ as well, however I generally aim for:
Histogram at ~50% (25% for blue channel)
Gain at ~50%
Frame rate around 150 fps
Obviously each of these influences the other but as we are capturing so much data you can use a reasonably high gain setting to get yourself within the other parameters I’ve stated.

Capturing Mars under reasonable seeing using SharpCap - 685nm IR Filter
Below you can see the .ser files produced by the imaging run shown above. SharpCap creates a directory on your desktop called ‘SharpCap Captures’ and creates sub-directories dependent on the date on which you are imaging. In addition if you provide a name for the target you are shooting it will also create a sub-directory with that name, in this case Mars. All this is configurable in the application as well as the file naming convention you wish to apply to your data files, make sure you choose WinJupos format as this will save you some time later.
Below you can see five .ser files have been created for the IR data, I then changed filters, re-focused and generated five for the red data and same again for the blue. As the whole imaging run only took sseven minutes I captured each set as a batch to minimise filter change and re-focus time.
Now the data has been captured you are ready to move on to the processing stage.

Stacking and Sharpening the Data
The first processing step is to stack the videos you have captured, to do this I recommend using AutoStakkert 3. The image below shows one of the captured .ser files open in the application, it shows how I would normally set the various options on the screen. The only item I may change is the frame percentage to stack as this will vary depending on the quality of the input video. I try to keep it around 50% but always perform an analyse on the image first to confirm this is OK, if not I’ll reduce the percentage accordingly. Another point to note is that you don’t need masses of alignment points, here I just have 9 selected by the software with multi-scale checked. A large number of small alignment points can in fact often produce a much worse result.
Once I’m happy everything is set correctly I will stack the first file, once this is complete I’ll select the others in file manager and simply drag them onto the open AutoStakkert window and hit stack again. This will process the other files as a batch using the same parameters as the first video - at this point you can go off and have a coffee!

AutoStakkert will create a sub-directory within the directory holding the videos as shown in the image below. The name relates to the percentage of frames you stacked, or the number of frames depending on the stack option selected.

These files are now ready to process in Registax. Before I start processing I create a ‘Processed’ folder within the stacked images folder, this is where I will save the sharpened images.
You can see here one of the stacked IR videos with sharpening applied - don’t take the setting shown here as the ones you should use as this is totally dependent on the dataset you are processing, however make sure you don’t over sharpen - less is more!

I repeat the sharpening process for each of the 15 stacked videos, you’ll find the wavelets you’ve selected for IR and Red filtered images will remain pretty consistent. For the blue images you can be a little more aggressive with your sharpening as this is where you will be capturing any cloud detail.
Each sharpened image is saved in the ‘Processed’ directory with the AutoStakkert suffix removed as shown below - this enables them to be imported into WinJupos for the next stage of processing.

De-rotation in WinJupos
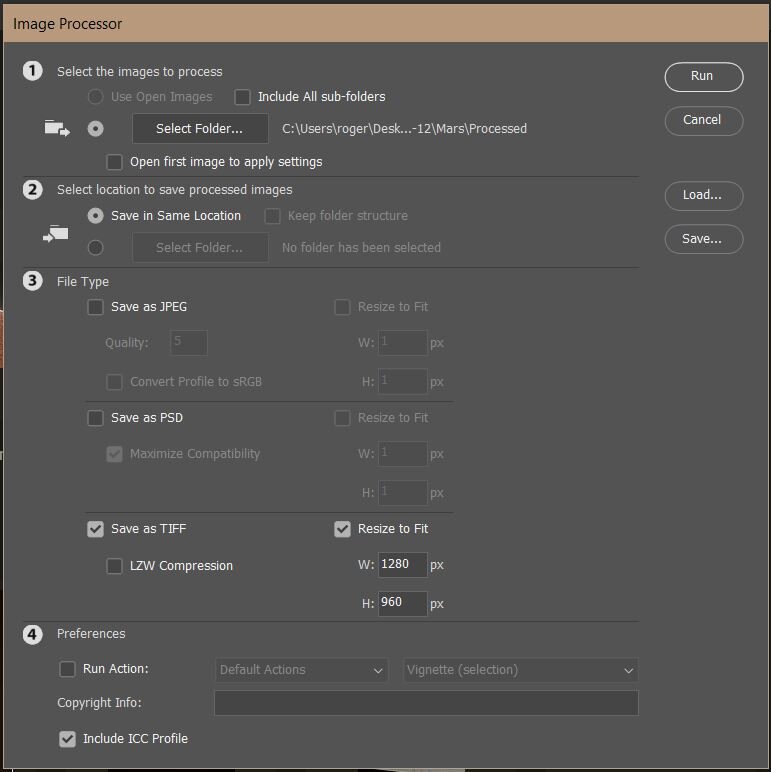
Before we begin the WinJupos magic remember what I said about image scale? I shot the videos using a capture area of 640x480 as the planet will fit into this area and reducing the area captured also means you can achieve higher frame rates. Before loading into WinJupos I increase this by 200% using the [File] [Scripts] [Image Processor] menu item in PhotoShop CC. In the image below you can see that I have selected my ‘Processed’ folder, am saving as a TIFF file and have used ‘Resize to Fit’ 1280x960, doubling the image size.
Hit Run and PhotoShop will create yet another sub-directory called TIFF where the re-sized images will be saved, these are the ones we are going to load into WinJupos and process further.
People can be a little wary of using WinJupos but really there is nothing to fear, I’ll start with a little refresher.
Make sure you choose the correct celestial body (Menu item [Program] [Celestial Body]), in this case Mars.
Then choose Menu items [Recording] [Image Measurement] and open the first image in the folder containing the resized images. The file name you saved your images as earlier will automatically set the date and UT values, you may have to input your longitude and latitude.
Next choose the Adj tab and use the Up/Down/Left/Right keys on your keyboard to navigate the outline frame to the planet. Make the frame larger using Page Up and smaller by using Page Down and rotate it to the correct north south orientation using the N & P keys.
A useful feature for Mars is that in the Adj tab you can display the outline frame with additional graphic which adds the main features visible at the time your image was taken. This serves as a really useful way of correctly aligning the frame.
Another feature that is useful in aligning is the ‘LD Compensation’ check box this will show the hidden edges of the planet for fine tuning.
Once happy deselect the LD compensation and go back to the ‘Imag.’ tab. There I input the filter used in ‘Image Info’ as this helps when compiling the final image - you should also record the channel in the ‘Adj’ tab.

Click F2 or the Save button to save the Image measurement file, I create yet another sub-directory to save these in - shown below. Repeat the process for all the sharpened images making any fine adjustments along the way - you will then end up with five image measurement files for each filter you shot.

Now to de-rotation!
Choose menu Item [Tools] [De-rotation of images]
Click on Edit and select Add, you then select all the image measurement files for one of your filter sets. You should have five files.
Change the LD value to around 0.80, otherwise you may get unwanted artefacts.
Select the destination directory (I’ve chosen my ‘Processed’ directory)
Make sure you have the correct north south orientation and hit Compile Image (F12) - this will create your de-rotated image for the selected filter set.
Repeat this process for all the other filter sets you have generated.

Here are the de-rotated IR, Red and Blue images. This is my final step in WinJupos but if you shot a set of green filter images you can then choose [Tools] [De-rotation of R/G/B frames] to construct an RGB image from your files (an image measurement file will have been automatically created for this purpose.

Processing Your De-rotated Images
You are now on the home straight, its time to create that synthetic green channel I’ve been referring to throughout this post.
First open the red and blue de-rotated images in PhotoShop and duplicate the blue image [Image] [Duplicate]
Copy the red image and paste it as a layer on the duplicate blue image
The red layer should be ‘normal’ and opacity should be changed to around 50%
Flatten layers and save as synthetic green. This is the image you will use as your green channel.


Below we can see the RGB image (top right) created by pasting the red, blue and synthetic green images into the relevant channels. Give this image a relevant name (RGB) and save to the directory you are storing your processed images in.

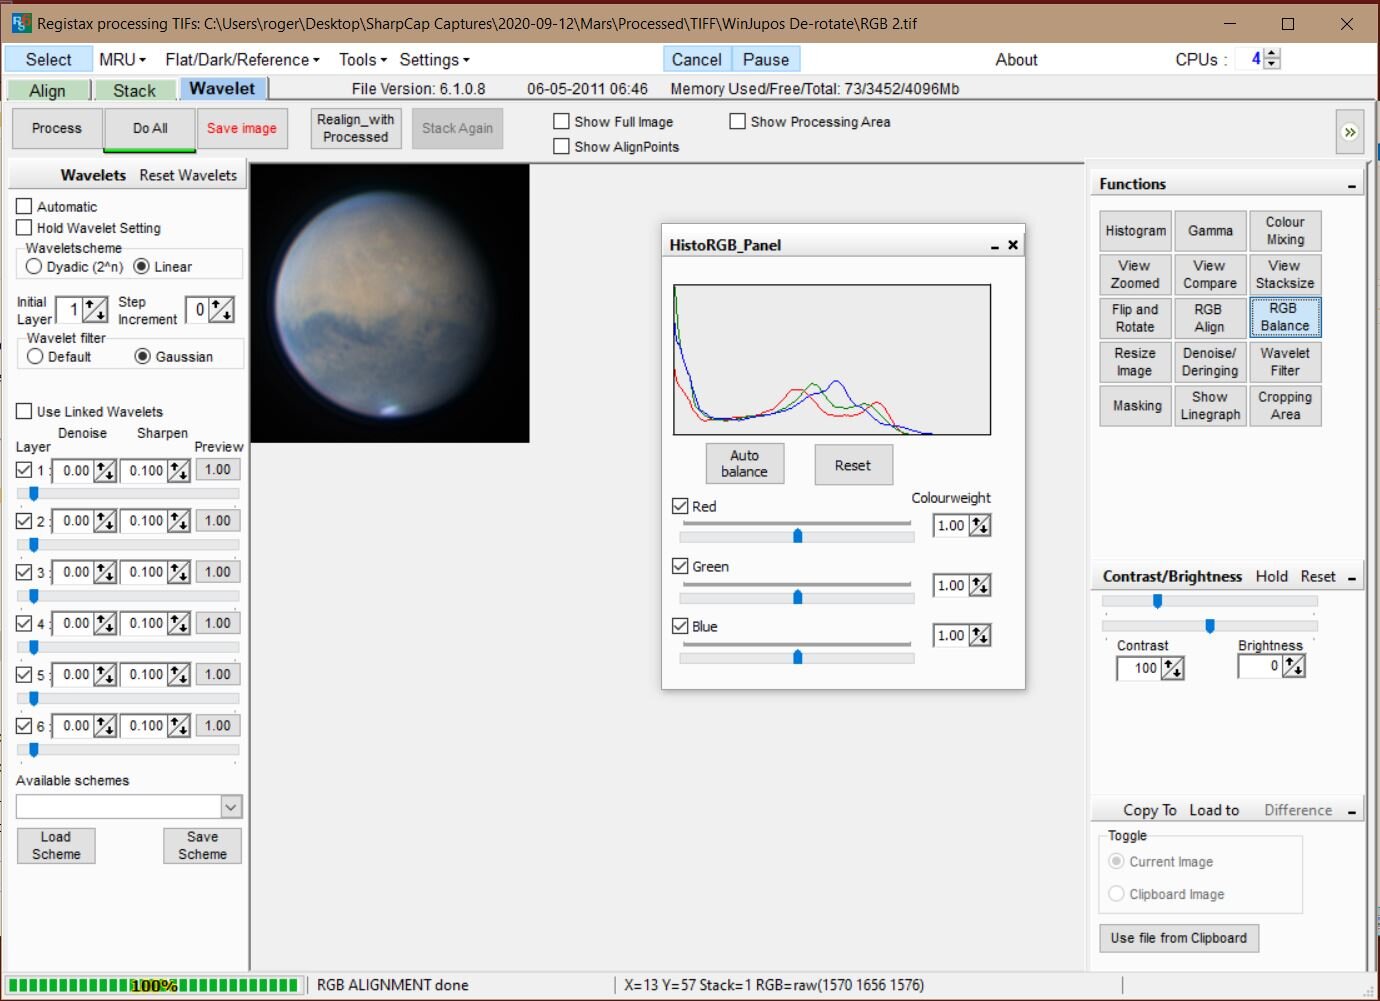
For the next stage we leave PhotoShop and go back into Registax. Here we will perform an RGB align and balance. First open your RGB image and choose RGB Align from the functions menu. Make sure the green box covers the whole planet and then click Estimate.

Next select RGB Balance and click Auto Balance, once done remember to click ‘Do All’ and ‘Save Image’

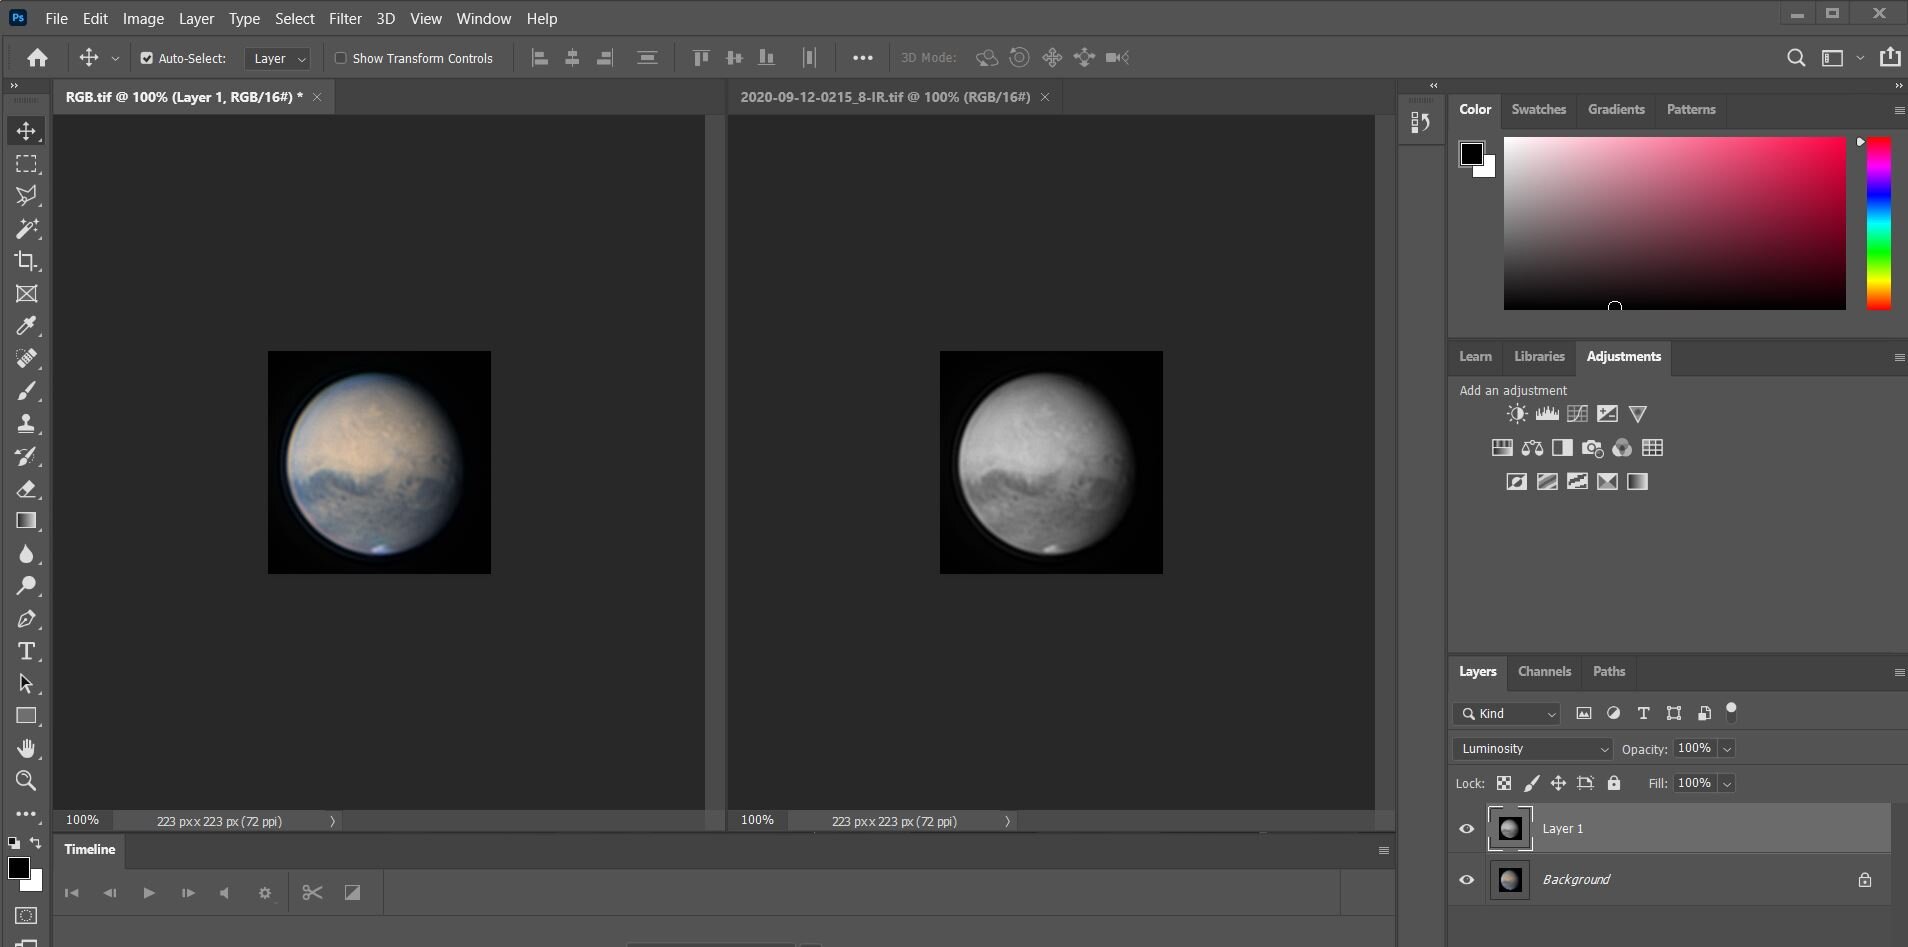
You now have completed processing on your RGB image open it in PhotoShop along with your IR image. There is a bit of debate as to whether you should use an IR or Red image as a luminance layer when imaging Mars, but I think it gives better results for me when imaging from my city location.
Paste the IR image as a layer over the RGB and select luminosity - Save this as a new image named IRRGB.
You can then perform some final processing on the image, I tend to increase saturation slightly as applying the luminance tends to slightly wash out the image. I also may adjust contrast and colour balance as with the image below and perhaps perform a little more sharpening with an Unsharp mask and some additional noise reduction.

You can perform some final tweaks if you want to improve the aesthetics of the image, below I’ve used crop to increase the black space around the planet and tilted it using Free Transform. Once you’re happy flatten layers as necessary and save the final image. You’re done - well done for getting to the end and happy Mars season!!
