Have you ever watched the International Space Station pass overhead on a clear night? If you haven’t you should, but this blog isn’t about witnessing the ISS as it zips across the sky, this is about rarer and more spectacular events.
Occasionally your location on the Earth, the orbit of the ISS and the position of the Sun, Moon, a star or planet conspire to perfectly align and when that happens you get an occultation (where the ISS completely blocks out the light from a star or planet) or a transit where the ISS passes directly between you and the Sun or Moon. Here I’ll try to share with you a few of the things I’ve learnt from successfully, and unsuccessfully, imaging these events over the years.
Planning your shot
Obviously you can’t just randomly choose a time to image the Sun or Moon and hope that the ISS passes across your field of view, you need to plan, and luckily help is at hand in the shape of the rather excellent website Calsky https://www.calsky.com. It is a fantastic resource, which I find invaluable for the planning of observations and imaging and is, in my opinion, the best and most accurate resource for the prediction of ISS transits.
The width of the ground track where a transit of the Moon or Sun is visible is only around 13 km, the middle of the 13 km band having a transit across the centre of the Sun or Moon, at the limits of the band of visibility the ISS would appear to graze the edge of the object. This fact makes it very important that Calsky knows exactly where you are on the surface of the Earth, especially for the prediction of occultations where the track of visibility may be measured in metres.
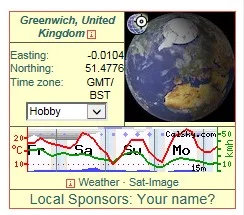
Calsky Location information
Your location is shown at the top right of the Calsky main page. To change it click on the location it has chosen for you (you can also save locations etc., but we’ll do it from scratch).
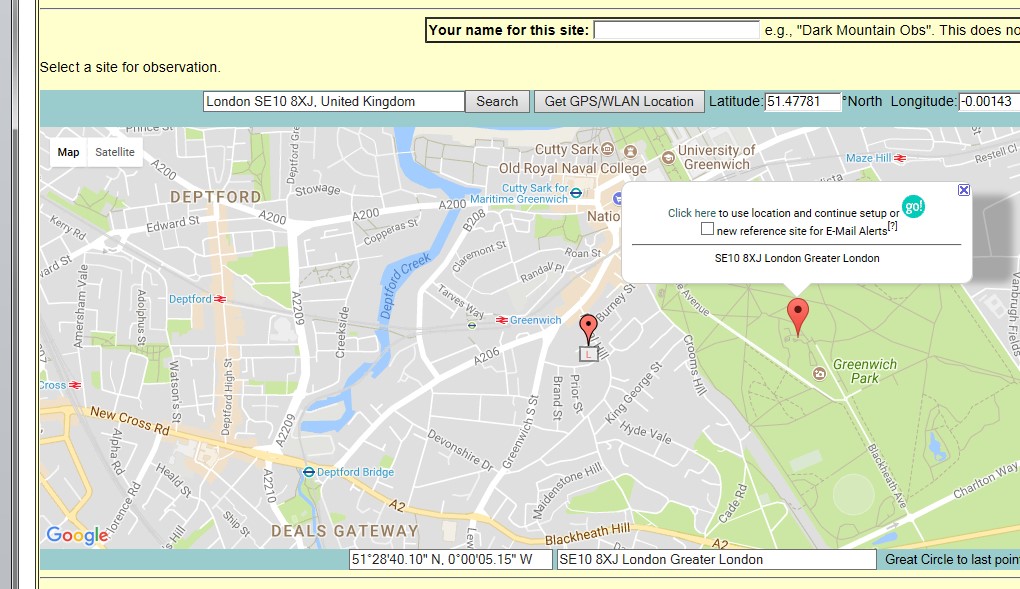
Setting your location in Calsky
Enter the postcode, zip or address of your chosen observing location and Calsky will bring up a map where you can further refine your positioning. Just click where it indicates to set this as the location from which it will base its calculations.
Now navigate to the Satellites/International Space Station ISS pages of the Calsky website.

Choosing your calculation period in Calsky
Select the period you want the calculation to cover, the start time defaults to the current date and time, I like to select 2 months for duration as I can then see any upcoming events. It should be noted that the further into the future the prediction is, the greater the uncertainty. A transit may be predicted but may not happen as the ISS has to adjust its orbit every so often, conversely a transit may happen where previously it hadn’t been predicted. My advice would be check the site regularly and always check the day before and on the day of the transit you are planning to image so that you have the most up to date and accurate information to hand.
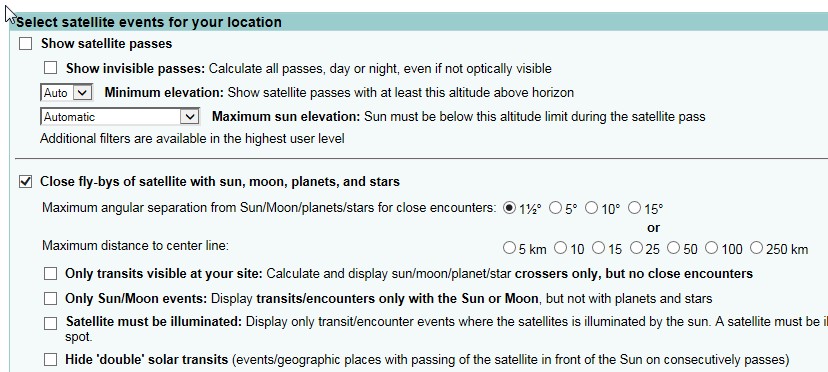
Narrowing the calculation to transits and close passes in Calsky
To only see predictions for transits and close passes un-check the Show satellite passes box and make sure the Close fly-bys box is checked and the minimum angular separation is set. You will then get a series of predictions for when the ISS is going to satisfy the parameters entered from your location.

Your returned calculation - yay a transit!
Here a transit of the Sun (which I managed to image) is predicted to occur at 16:52 and 32 seconds on the 18th June 2017. This is what you need to put in your diary!
Capturing the moment
I’ll assume you are using a planetary camera to image your chosen transit and capturing a .AVI or .SER video file, you can shoot using video mode with a DSLR or even shoot high frequency single exposures, but I’ve no experience of this so I’ll leave that to others to explain. I use SharpCap for planetary camera control but what I’ll cover here is equally relevant for FireCapture or any other camera control software.
The benefit of an ISS transit over imaging the ISS as it flies overhead is that you can set up, focus, and sort out your exposure well in advance. Lets face it, it’s pretty easy to find the Sun or the Moon, and if you have a tracking mount you can be sure the spot in the sky where the ISS is going to pass will stay in your field of view.
If your set-up doesn’t allow you to capture the full face of the Sun or Moon, or you want the ISS to appear at a larger image scale than this would provide then it really does become important to know exactly where the ISS is going to pass in front of your chosen object, nothing is more frustrating than having the camera rolling and seeing the tip of a solar panel pass at the extreme edge of your field of view!
Luckily Calsky comes to the rescue here as well providing a visualisation of the path of the ISS across the face of the Sun or Moon, just make sure you are capturing at least some of the area indicated with some wriggle room either side and you should be fine. Also make sure you know whether your scope inverts the image and in which plane.

Track of the ISS across the face of the Sun
For the Sun you need to set your exposure as you would for normal solar imaging, the ISS is going to appear is silhouette so you don’t need to consider it’s relative brightness – its always going to be darker than the Sun! For Lunar transits you may need to consider how bright the ISS is going to be relative to the part of the lunar surface it will be passing over. Check brightness when transiting on Calsky and keep your exposure short if you want to capture detail on the ISS and not over-expose. If you expose as you would for imaging Venus then you won’t be too far off, but err on the side of caution – you aren’t going to get a second chance, at least not without a bit of a wait.
Try to get as high a frame rate from your camera as you can by adjusting gain etc. the ISS moves very quickly especially if overhead so a slow frame rate will restrict how many frames containing the ISS you will end up with in your capture video.
When it comes to recording the capture video I generally start about a minute before the predicted transit time, though the Calsky predictions are accurate enough to reduce this if you want. A very important point is to make sure that you set a recording time limit that covers the period the transit is predicted for, don’t set a frame limit. If you can set your capture time limit to infinite even better, you can always stop recording once the ISS has passed. I have learnt the importance of this point through bitter experience, watching the ISS occult the star Aldebaran and congratulating myself on having captured it only to discover that the camera had stopped capturing after 3000 frames, stopping just before the main event!
Processing the results
So now you have managed to capture the transit you need to be able to process the results to show it off to its best effect and let others share the magic. There are lots of different options when it comes to processing, but I've described here the workflow that works best for me. Feel free to use whatever software you feel most comfortable with.
You will of course have watched your capture video back and confirmed that you have indeed got some frames there the ISS is seen moving in front of the Sun or Moon, you’ll also have noticed that the vast majority of the video contains no hint of the ISS (unless you are an adrenaline junkie who started recording just before the predicted transit time and stopped just after!). You can keep the capture video as is but I’ve found for extracting the frames where the ISS features life is made easier by editing a copy of the video down to the frames you want to stack as a composite ISS track.
There are lots of applications out there that will enable you to do this but I’ve found one of the easiest to use is a free application called VirtualDub. It can be downloaded from here http://virtualdub.org/download.html and allows you to perform basic editing on your video with minimal stress.
In the image below I have opened my ISS transit video and used the cropping buttons (highlighted) to indicate the frame range I want to keep in the copy output video. All you need to do is perform a File/Save As and it will save a cropped copy of the input video in your desired location.

The video processing screen in VirtualDub
The edited version of my capture video can be seen here - real time so blink and you'll miss it!
Once you have edited a version of your capture video down to the frames of interest you can then extract them as individual images. For this there are again a large number of options, but I’ve gone down the free software route and use Planetary Imaging PreProcessor (PIPP). This can be downloaded from here https://sites.google.com/site/astropipp/downloads
In the image below you can see the PIPP main screen with the edited ISS AVI loaded.

Load you video in PIPP
Go to the Output Options tab and choose an output format of .TIFF

Make sure you save your output as .TIFF
Once you have selected Do Processing the images will be saved to the folder of your choice as shown below

Your extracted single frames
Now the fun really begins. To create a composite of these images I use Photoshop Creative Coud taking advantage of the File/Scripts/Load Files into Stack menu option (pretty much all layer based imaging processing software will enable you to perform the same function but I’ll describe the Photoshop method here) , you can also choose for the images to be aligned which works reasonably well in most cases, though not all. In the screen shot below I’ve selected the individual frames extracted via PIPP.
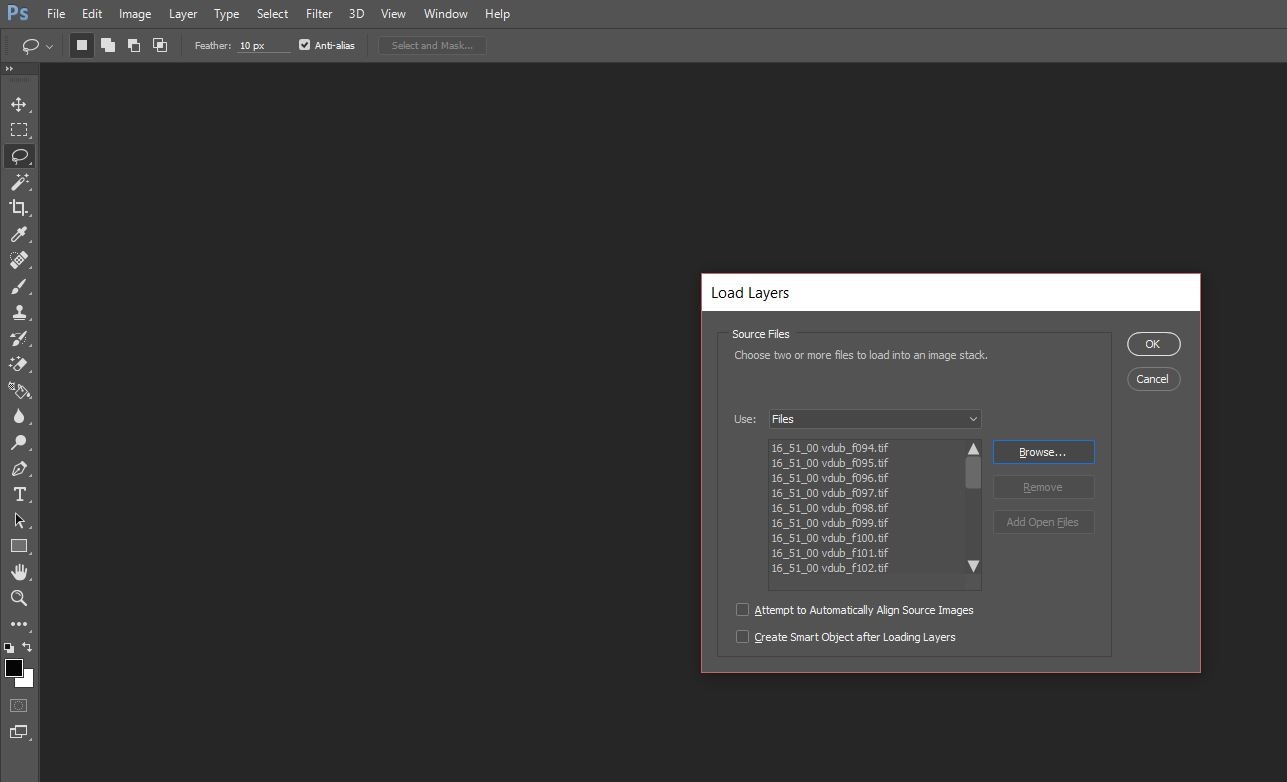
Loading your images into a stack in Photoshop CC
Once loaded into a stack I set the blending mode on each image to Darken as highlighted below.

Blend the layers in Darken mode
Once you’ve performed this on each of your frames you should get the result below which shows the track the ISS took when zipping across the Sun (my camera dropped a few frames at the end of the transit as you can see so it ends abruptly).

Your blended composite
I then crop this around the region of interest, lighten the background, and paste as a layer on top of my finished full disk mosaic (after the transit I made sure I had shot additional frames to enable me to cover the whole face of the Sun). Use blend mode Darken again and, when happy with the result, merge your layers.

Now paste your cropped composite onto your full disk solar image
After a little finessing and playing with RGB levels to brighten and render the image in false colour this is what you end up with.
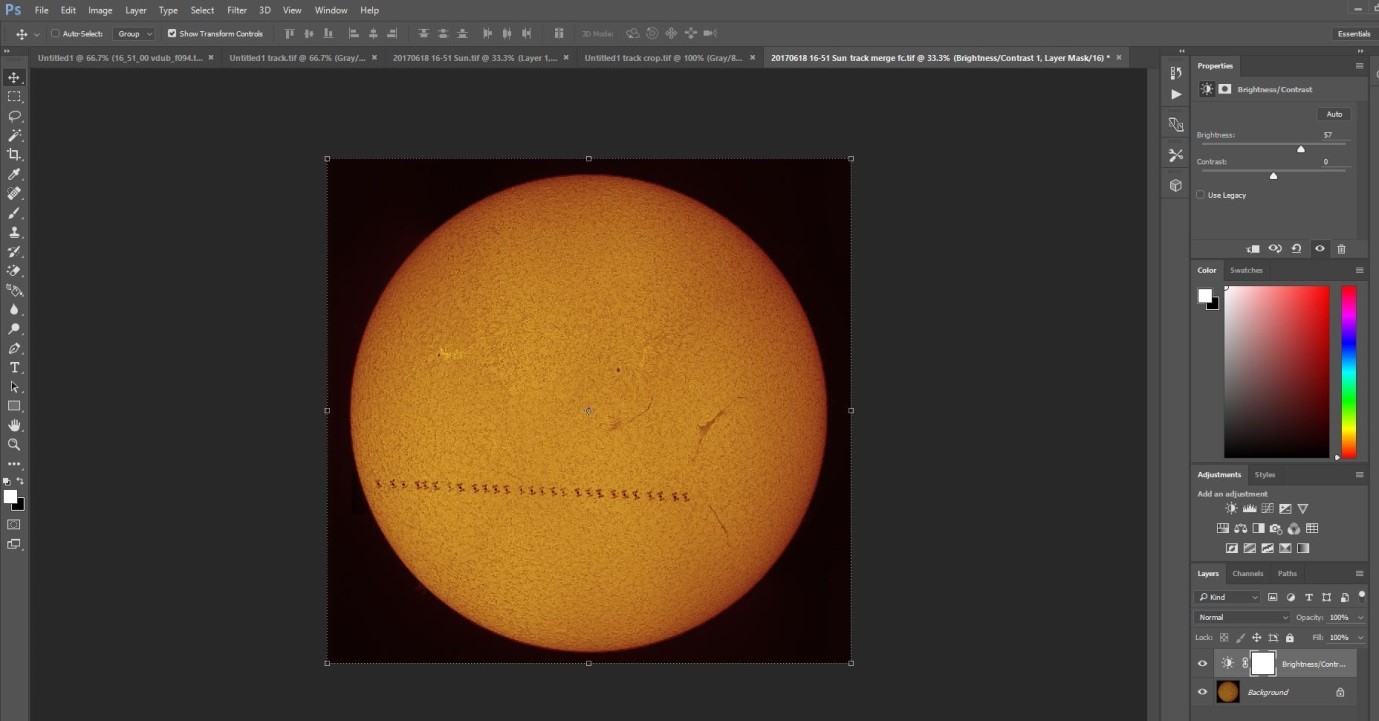
Lightened and blended image rendered in false colour

The final result
So now there’s nothing stopping you from trying this for yourself, apart from clouds…