I often get asked about how I capture some of the images shown here on my website, especially the processes around capturing high resolution images of the Moon. In this post I’ll attempt to cover what I think are the most important or useful tips, hopefully getting you on the road to producing your own high resolution photos of our nearest neighbour. Many of the points covered also apply to imaging planets and the Sun, topics I plan to cover at a later date.
When to Image
There are some things that will have a profound effect on the quality of your image that you aren’t in control of:
- Astronomical ‘seeing’
- The position of the Moon in relation to the horizon
If you look up the term astronomical seeing you find the following definition:
“Astronomical seeing is the blurring and twinkling of astronomical objects like stars due to turbulent mixing in the Earth’s atmosphere, causing variations of the optical refractive index. The astronomical seeing conditions on a given night at a given location describe how much the Earth's atmosphere perturbs the images of stars as seen through a telescope” Source: Wikipedia
In short the more the stars twinkle the worse the seeing is, it may be a beautifully dark and clear night but if the stars are shimmering away then you may as well forget about high resolution imaging. The effects of poor seeing are even more apparent through a telescope where it can appear as if the lunar surface is situated at the bottom of a very agitated swimming pool!
You can counteract some of the effects of poor seeing by using filters that allow only the longer wavelengths of light to pass onto the camera chip, typically IR pass and red filters (covered later). It also makes sense not to try to image over rooftops in winter or hard surfaces in the summer, the radiated heat causing turbulence, so try to find a spot overlooking fields or a park. If the seeing is very poor just wait for conditions to improve and enjoy the twinkling stars.
As well as using your eyes there are a number of websites that will give a good indication of what seeing conditions you are likely to encounter, a useful tool for planning whether it is worthwhile venturing out for the night. I’ve listed a few below but there are lots more that a simple google search should throw up.
Meteoblue Seeing forecast: https://www.meteoblue.com/en/weather/forecast/seeing/london_united-kingdom_2643743
Unisys weather: http://weather.unisys.com/gfs/gfs.php?inv=0&plot=300®ion=eu&t=12h
Even when the seeing is good the position of the Moon in the sky is also going to have an effect on the quality of your images. When the Moon is low to the horizon it's light has to pass through a greater thickness of atmosphere which causes the same sort of problems as poor seeing. For best results wait until the Moon is at its highest point (during darkness) and shoot then. In the summer months this can still be quite low so the best lunar images tend to be shot in the winter time, apart from when the Moon is a slim crescent when spring and autumn is best as the ecliptic is at its steepest.
What to Image
What you image is of course a matter of personal taste, however, anyone who has ever looked up when the Moon is out will appreciate that it is a dynamic object, its appearance changing as the Sun illuminates its surface over the monthly Lunar cycle. The best time to image depends on whether the target you have chosen is a crater or mountain range, a sea or ray structures.
If you want to image a crater or one of the beautiful lunar mountain ranges then it is best to wait until your target is near the terminator (the line between light and dark). The shadows cast will bring the features into sharp relief and best show off their structure.

Copernicus
Lunar seas are best imaged under similar conditions to craters and mountains, a low angle of illumination bringing out features such as rilles, craterlets and domes

Sinus Iridum
Ray structures such as those around the craters Copernicus, Kepler and Tycho are best imaged under full illumination, so wait until the period around the full Moon before tackling these targets.

Kepler & Copernicus inverted rays
It is also fun to try to image features near the Lunar poles, especially the heavily cratered south. The foreshortening caused by their position really helps to create a sense of depth to the image, giving the impression of flying over the surface of the Moon.

South from Moretus
Apps are great for choosing when to image and what will look its best on your chosen night. I’ve found ‘Moon Globe’ to be especially useful and would recommend it.
Equipment
Telescope
For high resolution imaging a simple rule applies, the longer the focal length the better (within the limits of your local conditions of course). The issue with imaging at long focal lengths is that the light from your target is dimmed so good light gathering power is also preferable; a large aperture telescope will produce better results than a smaller aperture instrument.

Celestron Edge HD11
Even if you have a wide aperture scope with a long focal length it is still unlikely that this will be enough for high resolution imaging, this means you’ll need to employ some form of image amplification via a Barlow lens or Powermate. I use a Televue Powermate and have found the 2.5x (increases your scopes focal length by 2 ½ times) version the best for my set up. This equates to an effective focal length of 7000mm when imaging using my Celestron Edge HD11 scope. At these focal lengths you will also need a good sturdy mount with good tracking as a highly magnified image will quickly slip out of your field of view if alignment and tracking is poor.
It is also worth mentioning collimation as poor collimation will drastically reduce the quality of your images, you can have a big expensive scope but if it is badly collimated your results will be disappointing. If you have a refractor this shouldn't be an issue, if you have a Newtonian reflector it is likely you will need to re-collimate regularly, less so with Schmidt-Cassegrain scopes.
Poor collimation results from improper alignment of the mirrors of the telescope, so in order for light to be properly focused in your eyepiece or camera your primary and secondary mirrors need to be properly aligned. How you collimate depends on your scope so I won’t go into details here but there are lots of resources on the web that will take you through the process.
Camera
For high resolution imaging it isn’t a case of pointing and shooting a single image as you would when taking a selfie or snapping something on holiday. To create a high resolution image we need to shoot a video (.AVI or .SER) which we then process into a single stacked and sharpened image (more later). For best results you should use a high frame rate planetary camera with a sensitive chip. The choice between a colour camera or a mono (black and white) camera is down to how much time and effort you want to spend imaging but I would always recommend using a mono camera as this will produce the best results in terms of image quality and resolution, the whole pixel being used to collect data rather than being shared across a number of colour filters.
You can still take colour images with mono cameras, all you have to do is image your target through red, green and blue filters and combine them in image processing software to create the combined colour image. This is however somewhat redundant in the case of the Moon as a grey-scale image pretty accurately represents what the eye sees anyway.
In terms of the make and model of camera I would recommend those made by ZWO, I use a ZWO ASI174MM camera and have owned a ASI120MM in the past, these are brilliant little cameras and competitively priced.

ZWO ASI174MM camera with filter wheel & Televue 2.5x Powermate
It is worth noting that you can also shoot video using a DSLR camera but as I have no experience of this for high res lunar imaging I'll leave that to others more qualified to discuss.
Filters
Filters are a great way to counteract the affects of poor seeing. For lunar imaging I use a Baader 685nm IR pass filter which really helps to improve image quality, a similar effect can be achieved by employing a red filter. IR filters do create a dimmer image (hence a large aperture being preferable) , a red filter will produce a brighter image which may enable you to image at a higher frame rate without having to increase gain which introduces noise.
Acquiring Your Image
The atmosphere is still, the Moon is high, the phase is right and you have all the gear, congratulations, now you can start acquiring your images!
Planetary cameras are really just a chip so you’ll need to link it to a laptop with image acquisition software installed in order to capture your video. There are really only two applications I would recommend for this FireCapture and SharpCap. Both are free with FireCapture being the tool of choice for most planetary imagers as it offers the most functionality. I actually prefer the pared down SharpCap but really you should try both and see which one works best for you and your equipment, they are both free so you don't have to worry about cost.
I won't go into all the ins and outs of how to use these applications as they both has very good help facilities and are pretty user friendly, I'l just cover some basic points I have found useful.
FireCapture: http://www.firecapture.de/
SharpCap: https://www.sharpcap.co.uk/
Focus
It seems obvious but it is worth stressing how important good focus is, you can have everything in place and conditions may be perfect but if you haven't taken the time to focus properly you may as well have stayed indoors on a nice warm sofa. I find the best approach is to find a prominent feature and gently move the image in and out of focus until you find the sweet spot, you'll also need to bear in mind that the point of focus will change as the temperature changes throughout the night so you'll regularly have to re-focus for the best image. The point of focus will also change when imaging through different filters so you'll need to slightly change focus on each change from red to green to blue filter.
SharpCap and FireCapture both offer tools that help with focusing and if you want a lower tech approach a Bahtinov mask is very helpful.
Framing
As you are capturing a highly magnified image make sure it is in the centre of the frame of your video, it can take a little while to capture the frames you want if the frame rate is low and the last thing you want is for your target to drift out of shot. If you plan to stitch together a panorama consisting of a number of shots make sure there is plenty overlap in your frames, there's nothing worse than taking time to produce a panorama only to find when you try to process it you are missing a thin section from the middle.
Shooting
Generally I aim to shoot around a 2000 – 3000 frame video for later stacking, as the Moon is a bright object you can reduce the gain of your capture (think of it as ISO in a normal camera) which will reduce the noise in your image meaning the number of frames you need to stack (see later) to produce a low noise result will be quite low.
As you reduce gain you will have to increase your exposure, but take care not to over expose your image. SharpCap has a handy feature called 'Highlight Over Exposed' which causes any overexposed parts of the image to flash, all you have to do is reduce the exposure or gain until this stops. You can also make use of the Histogram function within your acquisition software, you need to make sure the graph does not continue all the way to the right hand side, aim for 80% (see the image below). It is also worthwhile keeping an eye on the number of frames per second you are capturing, I would recommend around 30 fps as a minimum for Lunar imaging.
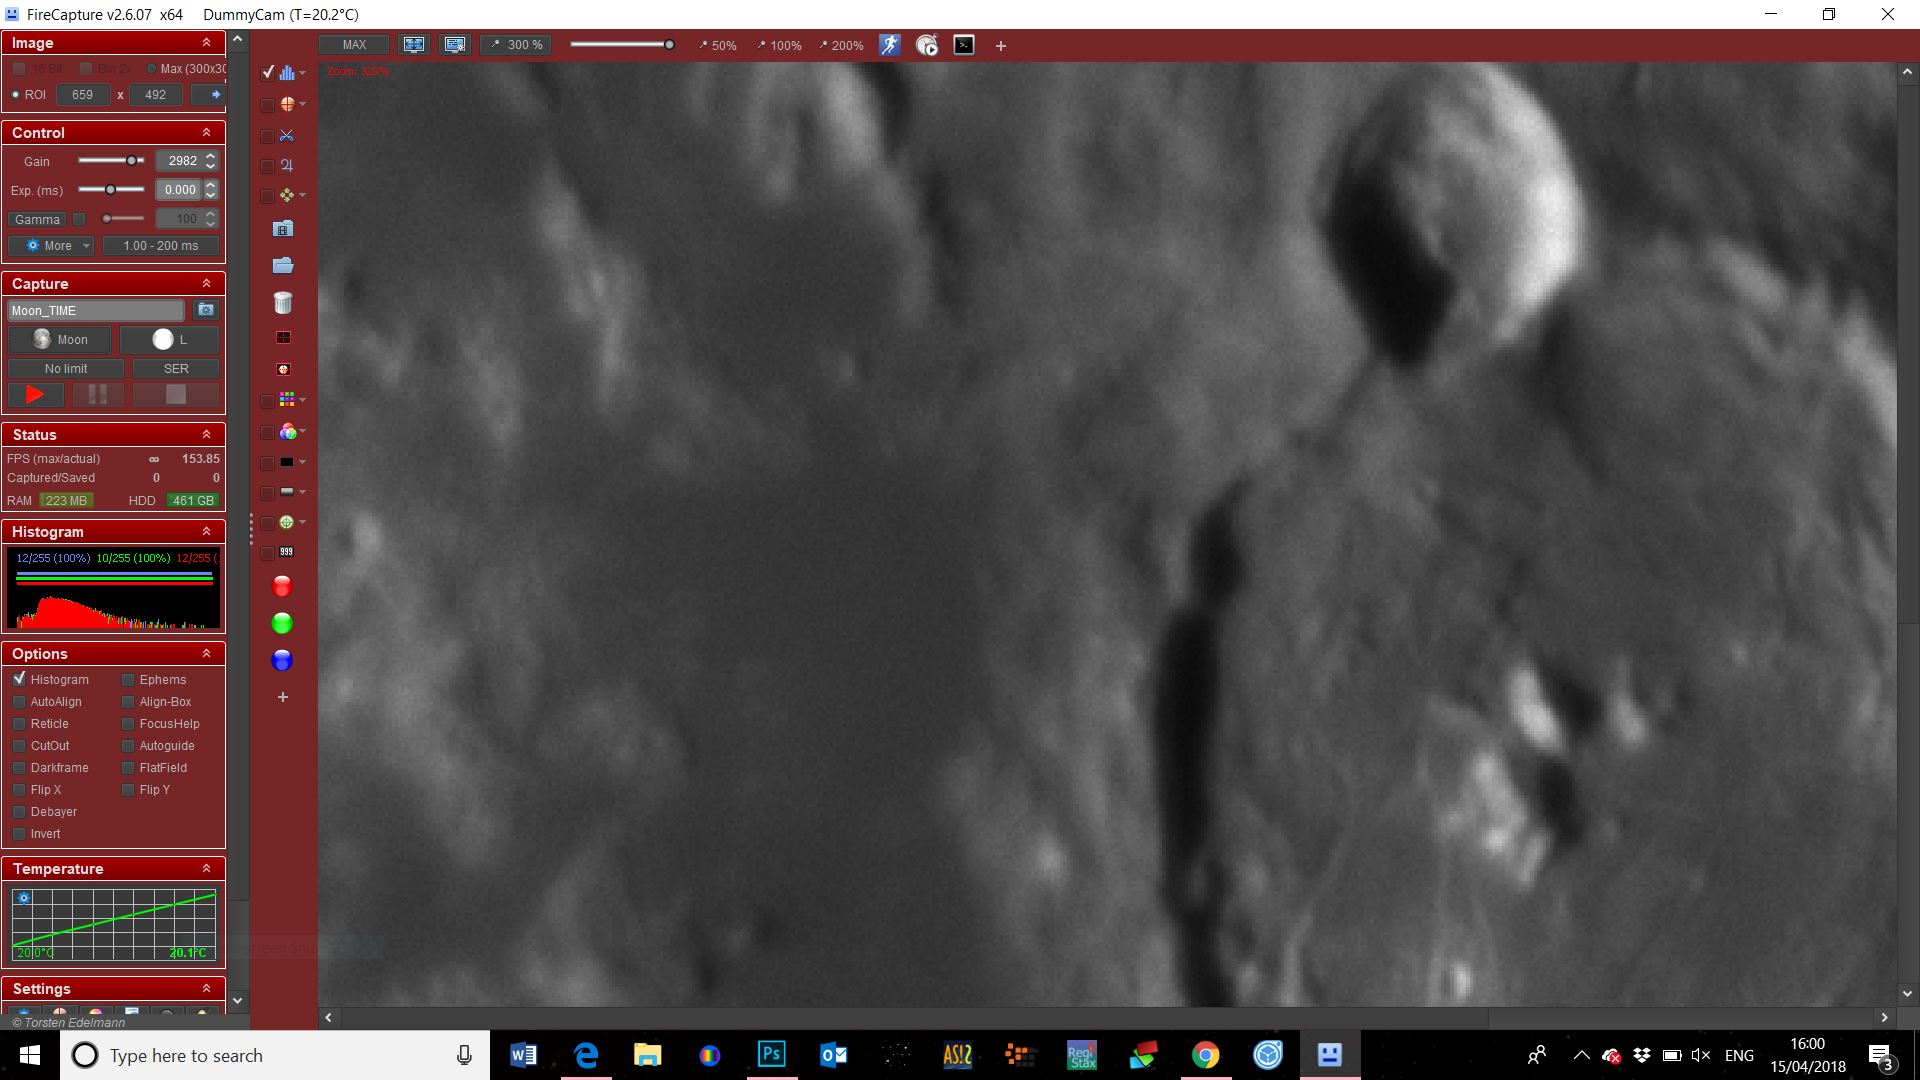
FireCapture imaging in progress
Processing Your Image
You now have your precious .AVI or .SER file so the fun bit of creating your final image can begin. Image processing consists of stacking and sharpening the video you have acquired and to do this there are two fantastic applications that pretty much every lunar, solar and planetary imager uses, AutoStakkert!2 and Registax6. They also have the added bonus of being free.
The whole stacking and sharpening workflow can be done using Registax, however I find that AutoStakkert does a better job of analysing and stacking so I use it for this and Registax solely for sharpening the image.
The image below shows the initial screen you will be faced with in AutoStakkert once you have opened the video you wish to process. For lunar images make sure you have checked 'Surface', you will then see a green box appear, place this on the main area of interest in your image, if you want to make it larger click Alt-9, then click 'Analyse'. This will perform a rough alignment and order the frames of your video in order of quality. When analysis is complete a graph will appear which ranks quality against percentage of frames and also shows how much each frame differs, this will help you assess how many frames to stack.

Autostakkert Load and analyse screen
Once the video has been analysed you need to place the alignment points on the image. For lunar images I go for a relatively small size, 64 pixels in the example below, click on 'Place AP grid', this will place alignment points across the image. One point worth noting is that you shouldn't have any align points in the very dark area of the image such as the shadow within the crater Copernicus (below) as this will confuse the software and you won't get the best result.

Autostakkert alignment points
As you have shot your images with low gain you will not need a large number of frames to produce a smooth sharp result. In the example below I've only chosen the best 200 frames of a 2000 frame video to stack, but as the video was pretty noise free to begin with we can be very selective. With planetary imaging you would typically stack a much larger number of frames as your video will have been shot with a much higher gain and will be correspondingly much noisier.

Autostakkert stack settings
Now you need to sharpen your image, for this you are going to use Registax6. Open the stacked TIFF produced by AutoStakkert in Registax and you will be presented with the screen below. The wavelet sliders on the left hand side are what you will use to sharpen your image, with sliders 1 - 6 acting on progressively finer detail. If you have good quality data you will probably be able to get away with only adjusting slider one, as shown below. If you are too aggressive with the sharpening it will be very apparent so less is more in this, don't go for a super sharp image as this will look false and artifacts will be introduced.
The degree of sharpening and noise reduction can also be controlled by adjusting the values in the boxes above each slider so it's worth experimenting with these also. If you are feeling brave have a go at checking the use linked wavelets box, for this you will definitely need to make use of the 'Denoise' boxes. The best thing is to experiment with the sliders as every image is different, but remember don't over sharpen.
Once you are happy with the result click 'Do All' and then 'Save'.

Registax 6 - sharpened image
AutoStakkert - for stacking: http://www.autostakkert.com/
Registax for sharpening: https://www.astronomie.be/registax/
Final Steps
You're almost there, just some final tweaks to perform and you have your image. For final processing I use PhotoShop CC but you can also use free software such as GIMP for these actions as there is little you need to do to the image you have already processed via the steps described previously.
Really there are only two things you need to do, crop your image and adjust the levels. Cropping is needed as stacking generally creates a ragged edge to your processed image, an artifact of the alignment process, so at the very least crop away the edges of the image to clean it up. For lunar images I also tend to lighten the mid tones via the levels layer. You can also change the aspect of your image by rotating it and create mosaics (remember to mosaic after cropping but before adjusting levels etc.). You shouldn't need to perform any further sharpening or noise reduction as this will have already been done. That's it you can now sit back and admire your handiwork!

Image cropped in Photoshop and levels adjusted